
Removing old wallpaper from drywall is one of those home projects that sounds simple until you’re knee-deep in soggy paper scraps and wondering if you’ve just ruined an entire room. Drywall is softer and more moisture-sensitive than plaster, so the usual “soak and scrape” method that works on older homes can quickly turn into a gouging, patching, and repainting nightmare. After stripping wallpaper in six houses (and learning every possible mistake along the way), here’s the exact process I now swear by in 2025.
Step 1: Know Your Enemy – Identify the Wallpaper Type
Not all wallpaper is created equal, and drywall survival depends on this first diagnosis.
- Traditional paper: Usually peels off in long strips when dry. Lucky you.
- Vinyl or “peel-and-stick”: The top layer peels cleanly, but leaves a sticky backing.
- Fabric-backed vinyl: Tougher; requires scoring and stronger solutions.
- Multiple layers (common in homes built 1970-2000): You’ll cry, then follow this guide twice.
Do a test patch in an inconspicuous corner. If the paper comes off dry and leaves clean drywall paper underneath — celebrate. If it sticks like it’s glued with superglue, keep reading.

Step 2: Gather the Right Tools (2025 Edition)
Skip the $12 steamer from the big box store. Here’s what actually works:
- Piranha gel wallpaper stripper (2024 formula) – enzyme-based, low odor, safe on drywall
- PaperTiger scoring tool (circular blades, not the old wheel style that tears drywall)
- 6-inch and 10-inch flexible drywall knives (plastic or stainless with rounded corners)
- DIF Gel Spray (as backup)
- Pump sprayer (garden variety, 1-2 gallon)
- Hot water + 1/4 cup fabric softener OR 1 cup white vinegar per gallon (budget option)
- Peel Stop Clear Binding Primer (you’ll thank me later)
- Large cellulose sponges and plenty of drop cloths
- Optional: Wagner 725 Power Steamer (if you have 10+ hours and hate chemicals)
Step 3: The Scoring Secret Most DIY Videos Get Wrong
Over-scoring is the #1 cause of drywall damage. The new PaperTiger tools with adjustable pressure are better, but still: light, overlapping circles only. You want tiny perforations for solution penetration, not shredded drywall paper.
Pro tip: Score in 3x3 foot sections right before you spray. Don’t score the entire wall at once — the perforations close up as drywall paper swells.
Step 4: The “Less Water Is More” Method
Here’s where 99% of people destroy their walls: too much liquid, too long.
2025 technique:

- Mix Piranha gel or DIF gel in your pump sprayer according to directions.
- Lightly mist (not soak) your scored section.
- Wait exactly 8–10 minutes. Set a timer.
- The paper should look slightly darker and feel soft, not dripping wet.
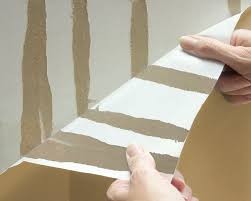
- Start at a seam and peel downward with a 6-inch knife held at a 30-degree angle.
If it’s not releasing easily, spray once more and wait another 5 minutes. Resist the urge to flood it.
Step 5: Removing the Backing Paper and Glue
After the face layer comes off, you’ll see the brown backing paper glued directly to the drywall paper. This is the danger zone.
Use the same gel spray method, but now switch to a 10-inch knife and very light pressure. Work in small 12-inch sections. The goal is to lift the backing without lifting the brown kraft paper layer of your drywall.
If you see fuzzy brown paper coming up — STOP. You’ve gone too deep. Switch to the plastic scraper and more patience.
Step 6: The Magic of Hot Vinegar + Fabric Softener (When Gel Isn’t Enough)
Stubborn foil or 1980s borders often laugh at commercial strippers. Mix:
- 1 gallon hottest tap water
- 1 cup white vinegar
- 1/4 cup liquid fabric softener
Apply with a sponge (not sprayed), wait 15 minutes, and scrape. The acetic acid + surfactants break down old paste better than anything sold in 2025.
Step 7: Cleaning and Damage Control
Once all paper is off:
- Wash walls twice with warm water + a capful of TSP substitute
- Rinse thoroughly
- Let dry 48 hours (use fans and dehumidifier)
- Lightly sand any raised drywall paper fuzz with 120-grit screen
- Immediately coat the entire wall with Gardz or Peel Stop clear sealer. This locks down torn paper fibers and prevents bubbling when you prime/paint later. Do NOT skip this step.
Common Mistakes That Ruin Drywall (And How to Avoid Them)
- Using a steamer too close or too long → steam penetrates and dissolves the drywall core
- Soaking walls for hours → water wicks behind drywall paper and causes bubbling that shows forever
- Aggressive scraping → gouges require joint compound patches that telegraph through paint
- Skipping the sealing primer → torn paper expands when you paint, creating blisters
How Long Should This Actually Take?
Realistic timeline for a 12x12 room with standard vinyl wallpaper:
- Prep and scoring: 3–4 hours
- Stripping: 10–14 hours spread over 2–3 days (working in sections)
- Cleanup and sealing: 4 hours + drying time
Yes, it’s slow. But doing it right once beats patching and sanding for weeks.
Final Thoughts
Stripping wallpaper from drywall in 2025 is still a pain, but with enzyme gels, better scoring tools, and the “less is more” water philosophy, you can get perfectly smooth walls without turning your room into a joint compound disaster zone.
Take your time, work in small sections, and remember: the wallpaper has been there for 20–40 years. It’s not coming off in an afternoon, and that’s okay. Your future self (the one admiring smooth, freshly painted walls) will thank you for the patience.


